The beginner section describes
how to turn a picture into a link. A Clickable Image Map is such a picture, but with one
difference. Instead of a whole picture being a link to a certain page, the image map
contains several sections, each of them linking to a different page. For example, say you
had a picture of a building, and when you clicked on the first floor you would get to a
page describing the first floor, when you clicked on the lobby you would go to a page
describing the lobby, and so on. Another use is to have a picture that shows some people,
and when you click on a person, you get a page describing him or her. Such a
link-in-a-picture is called a "hotspot". Before you begin I must warn you: Creating
a Clickable Image Map is hard. Even very hard. I suggest you print this page or
save it on your hard disc so you can read it over several times.
Here is an example of a Clickable Image Map:

A Clickable Image Map needs several tags. First you need a
<Map Name="Name of Map">
tag. The name of the tag is just a name you give your image map; it doesn't need to
have anything to do with the image's filename.
The next tag you need is:
<Area Shape="shape" Coords="Coords" Href="URL"
>
You need a tag like this for each hotspot you want in your picture. The Shape attribute
can have a value of rect, circle or polygon. If you right-click the bag of money in the
image map above, you will see that the link is in the shape of a circle. Similarly, if you
right-click the flower, you will see that the link is in the shape of a square, and if you
right-click the sheep, you will see that the link is an irregular polygon.
The "Coords" attribute defines the border of the link. If the link is a
rectangle, the tag will look like this:
<Area Shape="rect" Coords="X,Y,Height,Width"
Href="page1.htm">
The first two numbers refer to the upper-left corner. X refers to the number of pixels
from the image's left border to the link's left border. Y refers to the number of pixels
from the image's top border to the link's to top border. The Height and the Width refer to
the height and width of the link in pixels.
For example, to make the link to the flower in the example above, the tag would look
like this:
<Area Shape="rect" Coords="65, 102, 171, 199"
HREF="flower.htm">
Because the upper left corner is 65 pixels from the picture's left edge and 102 pixels
from the picture's right edge, the first to numbers are 65 and 102, respectively. And
since the link's height is 171 pixels and its width is 199 pixels, the last two numbers
are 171 and 199.
If, on the other hand, you would like the shape to be a circle, the tag would look like
this:
<Area Shape="rect" Coords="X, Y, r, "
HREF="money.htm">
Here the X and Y refer to the center of the circle. Like with the rectangle, the X is
the distance in pixels to the image's left border, and the Y is the
distance in pixels to the image's top border. The third number, r, is the
radius of the circle in pixels.
Thus, the link for the bag of money in the Image Map above would be:
<Area Shape="circle" Coords="41,81, 41, "
HREF="money.htm">
Now for the hardest shape: The polygon. A polygon can have any equal
number of coords. The first pair of numbers ( X and Y) refers to the first point. The
second pair refers to the second point. The third pair refers to to the third point, and
so on. Your browser then connects all these points with a straight line like this: The
first point connects to the second point, the second point connects to the third point and
so on. The last point is connected in a straight line to the first point.
The link for the sheep in the image map above looks like this:
<Area Shape="polygon" Coords="178, 199, 175, 98, 222, 56, 252, 36,
283, 39, 283, 87, 270, 92, 286, 96, 299, 97, 299, 201, 182, 201, 182, 199"
HREF="sheep.htm">
The first pair (178, 199) is the point to the left of her right front leg. The second
point (175, 98) is to the left of her left right ear, and so on.
That's it for the description of possible shapes. We're moving on.
What we have now is:
<Map Name="Name of Map">
<Area Shape="shape" Coords="Coords" Href="URL"
>
(you can repeat this last tag as many times as you want)
You now close the <Map> tag using </Map>.
And now you add the <Img> tag:
<Img Src="filename of image"
Usemap="#Name of Map">
The text you put in the Usemap attribute is the name
you gave your map in the <Map Name="Name of Map> tag. Don't forget
to put a # sign before the map's name, or your browser won't recognize it as an image map.
Note: Like with regular <Img> tags, you can add other
attributes such as border, height, alt, etc. See the page on pictures in the beginner
section for details.
The code for the image map shown above will be:
<MAP NAME="example">
<AREA SHAPE="POLYGON" COORDS="178, 199, 175, 98, 222, 56, 252, 36, 283,
39, 283, 87, 270, 92, 286, 96, 299, 97, 299, 201, 182, 201, 182, 199"
HREF="sheep.htm">
<AREA SHAPE="RECT" COORDS="63, 98, 167, 199"
HREF="flower.htm">
<AREA SHAPE="CIRCLE" COORDS="41, 81, 41"
HREF="money.htm">
</MAP>
<Img Src="exampleismap.gif" Usemap="#example">
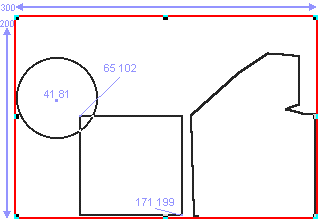
The Image below shows the location of all the hotspots
in the image map above, plus the coords of the rectangle and circle (the image is 200
pixels by 300 pixels. All the coords are in light blue):
Even after you understand all about clickable image
maps, making them is still a lot of work. You will need to know the exact number of pixels
from the image's border to the link's border, and without special programs this is a
tedious process of trial-and-error. Most graphic programs (such as Corel Draw) have a
"grid" option, and most HTML editors (such as Microsoft Frontpage) allow you to
manually draw hotspots on the picture.

